
View our simple-to-follow guide on how to install a kitchen sink. You can update your kitchen in a matter of simple steps.
It’s easy. You are supposed to prepare tools and materials. Then, measure and mark the kitchen sink’s layout, mark the cut lines onto the counter, cut a sink opening with a jigsaw, install the kitchen faucet, and attach a strainer over the plumber’s putty…
Continue reading.
Tools and Materials You’ll Need
- Tubing cutter
- Jigsaw
- Drill/driver
- Screwdriver
- Mechanic’s pliers
- Adjustable wrench
- Tape measure
- Hacksaw
- Utility knife
- Straight edge
- Spade bit
How to Install a Kitchen Sink?
Here are the details:
Measure and Mark the Kitchen Sink’s Layout
To center the sink within its cabinet, mark the counter’s back edge.
If sink has a template, align it with the mark on the counter. Place its back edge parallel to and 1 ½ inches away from the counter.
Trace around it before moving on to the following action. If there isn’t a template, mark the sink’s location with 2-inch tape.
Mark the center of the sink on its back lip.
Lay the sink upside down on the counter. Align the counter mark with the one on the sink.
Adapt the sink so that there is 1 ½ inches between the backsplash and the back edge. Make sure the sink is parallel to the edge of the counter.
After leaving a trace, take out the sink.
Measure the width of the sink lip, subtract 1/8 inch, and mark inside the sink outline by that much.
Connect all the marks with a straightedge to create the cut-out lines.
Mark the Cut Lines onto the Counter
You’ll end up with a rectangular outline of the sink’s hole on the counter after using a straightedge to connect the marks.
Round off the corners by hand to approximate the radius of the sink’s corners.
Next, drill a hole inside the radius at each corner of the cut-out lines using a spade bit that is slightly wider than the jigsaw blade (a ½-inch bit is typically adequate).
Cut a Sink Opening With a Jigsaw
Lower a jigsaw blade into a front hole and saw along the cut line to back hole. Repeat on the opposite side.
Over the cutout for the sink, place a scrap of wood that is a few inches longer. To keep it from falling or tangling the saw blade, screw through the scrap and into the waste from the cutouts.
Observe the front and back cut lines when cutting. The cut-out piece should be taken out.
Check the fit of the sink in the countertop and, if necessary, use a jigsaw to trim the hole.

Install Kitchen Faucet
On a cushioned sawhorse or counter, position the sink upside down.
The supply tubing and tailpiece of the faucet must be inserted up through the sink’s hole(s), through the gasket that seals the faucet to the sink, and through the gasket.
Screw the mounting nuts and washers to the underside of the sink deck.
Before tightening mounting nuts, make sure the faucet can swing a full arc across the sink.
Attach Strainer over Plumber’s Putty
Pack a thick roll of plumber’s putty under the strainer’s lip while the sink is still upside down and push it up through the drain hole.
If your strainer has a housing, place it against the underside of the sink along with the gasket, washer, and housing. Apply pipe-joint compound to the exposed threads.
Using pliers, tighten the locknut while holding the strainer in position after manually threading it onto the strainer.
The strainer is connected to the sink-drain tailpiece by the slip nut after the gasket has been fitted to it. While holding the strainer, tighten the nut manually.
Set the Sink and Connect Water Supply
Remove the tape, pulling toward center of hole.
Squeeze a bead of silicone caulk around the underside of the sink’s lip while it is still upside down.
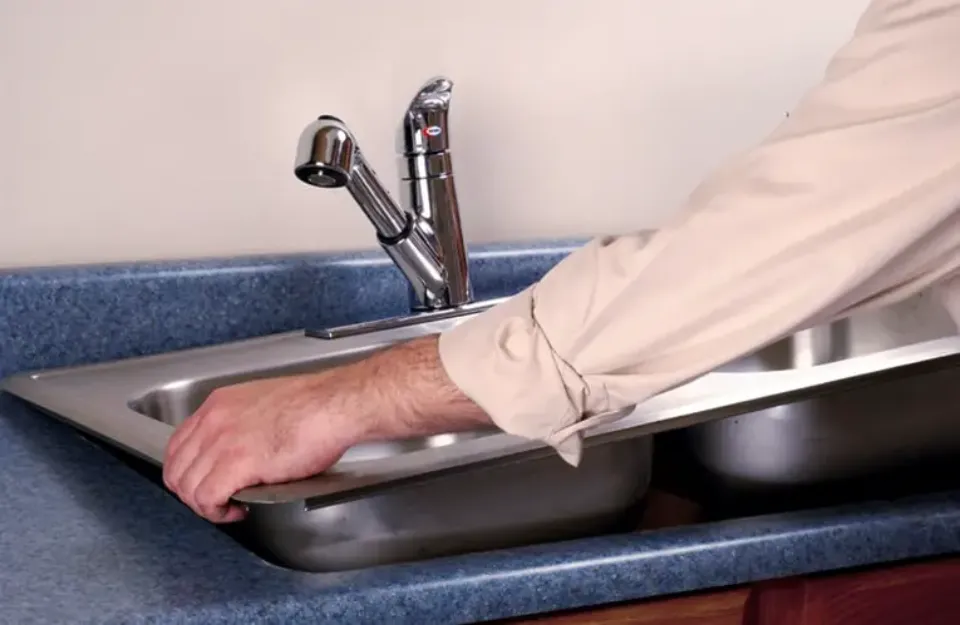
Turn the sink upright and set it into the countertop hole.
Verify that the sink’s front and the countertop’s front edge are parallel to each other. If necessary, adjust it.
Using acorn-head supply tubes or braided stainless steel hoses, attach the faucet to the shut-off valves.
Connect the sprayer hose to the faucet’s threaded tailpiece.
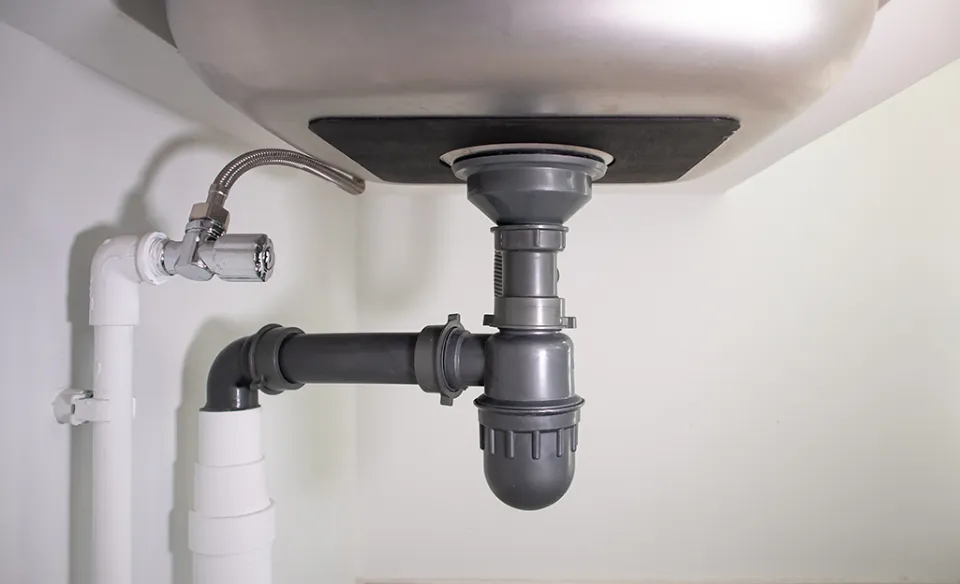
Connect the Drain Pipes
Attach the sink-drain tailpiece to the trap adapter.
Cut and dry-fit lengths of PVC pipe to connect the trap adapter to the trap and the drain elbow to the waste line. To fine-tune the pipes’ lengths and alignment, swivel the trap or slide it on the tailpiece. Separate the drain’s components.
With a utility knife, trim the cut ends. Apply PVC primer to them and their mate pieces. Let dry.
On the two ends that are being joined, brush PVC cement. Put the pieces together right away. Hold for 30 seconds.
All threaded connections should be reassembled and hand tightened.
Attach Dishwasher Drain and Tidy Up
The waste nib of the tailpiece should be connected to the dishwasher drain line. Utilizing a screwdriver, tighten the hose clamp.
Eliminate extra putty from the strainer’s lip.
Aerator removed, turn on the water at full force. Look for leaks at all connections along the supply and drain lines. If there are leaks, carefully tighten the nuts one-eighth turn at a time to stop the leak.
Ensure that the sink’s front edge is parallel to the edge of the counter. To hold the sink tight while the caulk sets overnight, fill it with water to weigh it down.
Read about How to Clean Kitchen Sink Drains?
Pro Tips for Kitchen Sink Installation
Although installing a new kitchen sink is not a difficult task, there are a few things to remember to make the process go more smoothly and make sure you won’t have to deal with issues later.
Many newbies learning how to install a new kitchen sink will often install the sink before the faucet. Save yourself a headache and install the faucet when the sink is out and the faucet’s nuts are much more accessible.
Before putting in a new sink, make sure that the countertop has been completely cleaned of the old caulk. If any caulk or putty is left behind, the sink won’t sit flush to the countertop, leaving tiny spaces for water to enter.
To seal the joints between the sink and countertop and the drain basket, many people instead use plumber’s putty. Since plumber’s putty dries out over time, water can leak through these seams and cause harm. Utilize caulk; it won’t dry out.
Plumbing maintenance frequently causes sediment to be released into the pipes, clogging your new faucet. Before connecting the lines to the faucet, flush this sediment out of them by purging them into a bucket.
Immediately after the sink is installed, slide a paper towel under the drain pipe and keep it there for a few days. Check it daily for signs of moisture to make sure there are no leaks coming from the newly installed drain.
- Install the new faucet before installing the sink.
- To ensure that the new sink sits properly, remove any outdated caulk.
- To seal the sink and drain, use caulk as opposed to plumber’s putty.
- Clear any sediment by flushing the supply lines.
- A paper towel can be used to check for leaks.
Expected Costs When Installing a New Kitchen Sink
You must consider both the price of the sink and faucet as well as the cost of the materials when estimating the cost of installing your new kitchen sink. (The following expert advice can help you save about $100 over buying a separate sink and faucet.) Depending on the material used, different sink types have a range in price. A new 1 1/2-inch PVC P-trap should cost between $8 and $12, and the schedule 40 PVC pipe you’ll need to make your connections should cost around $4.
While it is possible to reuse the supply lines for your faucet, it’s a good idea to replace them to maximize flow rate and minimize the chances of a leak. A fresh set of supply lines should cost around $15. In order to secure the sink to the countertop and set up the drain basket, you’ll also need caulk, which costs about $7 per tube. For your new faucet and sink installation, budget approximately $30 in supplies.
FAQs
What is the Best Depth for a Kitchen Sink?
The majority of kitchen sinks have a depth between 8 and 10 inches. A deeper sink might be easier to soak (and pile up) dishes, but it might be more difficult for shorter family members to use.
How Do You Install a Kitchen Sink With a New Countertop?
You must cut a hole in the countertop to accommodate the sink if you’re installing a kitchen sink with a new countertop. Luckily, most sinks come with a paper template that you can tape onto the counter to use as a cutting guide. Trace the shape using the paper then use a drill with a 3/8-inch bit and drill a hole in each corner. Drill from corner to corner along the line using a jigsaw.
Do You Need a Plumber to Install a Kitchen Sink?
No, with some simple tools and a few supplies, the majority of do-it-yourselfers can install a kitchen sink. A plumber may be needed for more challenging installations that involve moving plumbing.
Can I Install a Deeper Kitchen Sink?
You can install a deeper kitchen sink, but bear in mind that the International Building Code requires a minimum drop of 1/4 inch from the sink tailpiece to the drain. You’ll need to move the drainpipe, which is a job for a plumber, if your deeper kitchen sink, like a farmhouse style, doesn’t allow for this.
Final Thoughts: How to Install a Kitchen Sink?
While many people choose to hire a plumber to complete the installation of a new sink, you can complete the task yourself in a few hours with just a few simple tools and materials, saving you hundreds of dollars. Put your checkbook away, put on your tool belt, and use our guide to replace a kitchen sink on your own to complete the installation.
It’s easy. You are supposed to prepare tools and materials. Then, measure and mark the kitchen sink’s layout, mark the cut lines onto the counter, cut a sink opening with a jigsaw, install the kitchen faucet, and attach a strainer over the plumber’s putty…
Thank you for reading.