Paint and finishing brushes for trim are more complicated than they appear, which is perhaps surprising. In fact, every aspect of a brush—from the bristle type to the handle shape—is intended to perform a specific task, such as applying a finishing coat to a smooth surface.
Although the majority of paint brushes appear to be largely the same at first glance, selecting one might take a little more thought than one might anticipate. It can feel more difficult to choose the right brush than to complete the project because there are so many different bristle types, lengths, and designs available.
However, a well-made brush aids in giving off a cleaner, more polished appearance. The best paint brushes for trim are precisely designed, high quality, reasonably priced, and long lasting with proper care.
The best paint brushes for trim include Zibra, Bates Choice, Purdy, Richard, FolkArt…
Check out our list of the best ones to see which ones made the cut and learn how to choose the best one for your trim painting project.
Top Picks
Best Overall Paint Brush For Trim—Zibra
When painting trim, this Zibra paintbrush’s triangular head offers a special way to ensure that every possible detail is covered. As a result, you might no longer need to go through the pain of taping or repainting your walls because of an accidental drip because the angle makes it simple to reach corners where several walls meet and paint in a straight line. “I always tape when I paint,” one satisfied reviewer wrote. “I am terrible at cutting in at trim and ceilings. That was before this brush, though. I recently used this brush to paint a bathroom and a mudroom; no tape was used on the ceiling or trim.”
Best Budget Paint Brush For Trim—Bates Choice
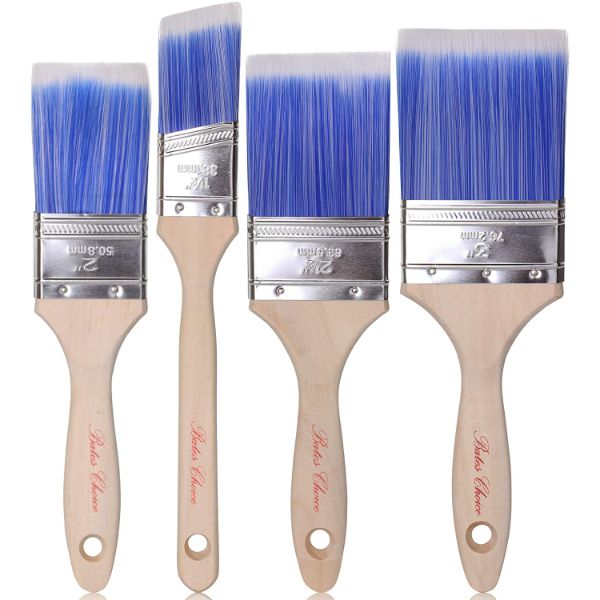
This Bates Choice set, which comes with two brushes, is a great choice if you’re on a tight budget for your painting project. The first has a slash edge, making it ideal for painting trim, while the second can be used on walls or wider baseboards, sills, and ledges. More paint can be applied per stroke thanks to the thicker synthetic filaments, and the lightweight, maneuverable wooden handle makes painting easier. One reviewer wrote, “[These brushes are excellent—I just used them for the first time yesterday. These brushes make painting interior doors and trim, which I have quite a few of, easy and smooth.”
Best Large Paint Brush For Trim—Purdy
Choose this three-inch version from Purdy if you require the control and precision that an angled brush provides without sacrificing surface area. It offers greater coverage than many of the smaller trim paint brushes that are available and is perfect for use with latex paints and primers. The bristles themselves provide a clean finish, making up for its unremarkable simple wooden handle. The entire brush is also coated with wax and made with filaments that revert back to their “relaxed state” after being used—meaning these tools will last through many projects. Many reviewers emphasized that you can really tell the difference in quality, despite the trim brush being a little more expensive than some of the other options.
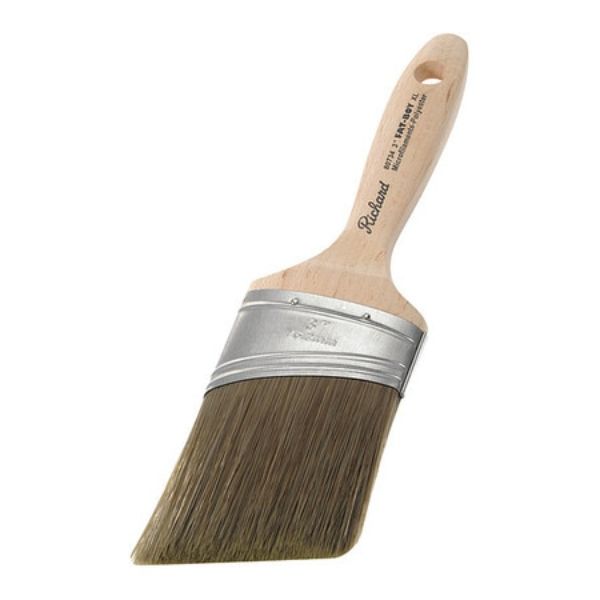
Best Paint Brush For Cutting In And Trim—Richard
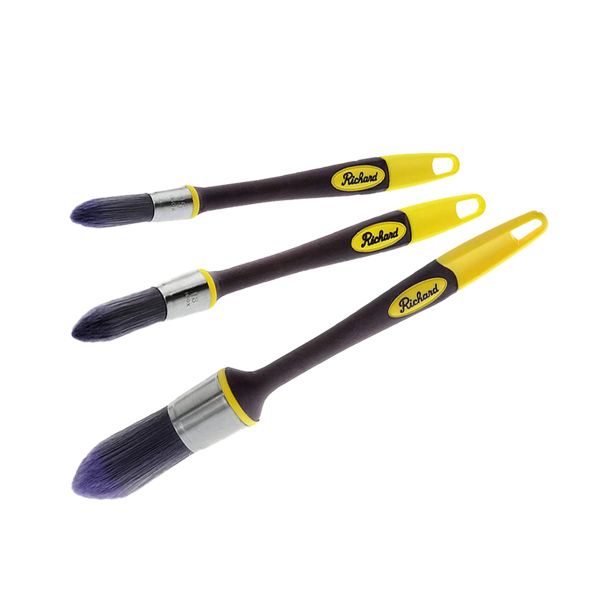
This trim brush from Richard has a rounded, angled head that is another unusual paintbrush shape. After using it to perfect your trim, you can also rely on it to cut in and outline the space around trim and framework, which can be difficult to do without the right tools. A soft grip handle that works in tandem with the tapered tip makes switching between projects easy and comfortable even during laborious painting tasks. “I am working on an old Victorian house with lots of trim,” described one satisfied buyer. “I can make crisp lines and access tight spaces with this brush. It cleans up easily and holds the paint well.”
Best Paint Brush For Trim Touch-ups—FolkArt
These FolkArt paintbrushes appear to be intended for art projects, but their tiny bristles and thin construction make them ideal for confined spaces and minor touch-ups, and the reviews support this. You can precisely fill in any gaps with one of the three brushes included in this incredibly affordable pack after sanding down any blunders, dents, or scratches. “These hold a sharp edge for touching up the trims like ceiling edges and are easy to clean afterward with warm water,” wrote one reviewer, who further explained that the bristles don’t fall out either.
Best For Loads Up Easily—Wooster 2 1/2″ Silver Tip Angle Sash
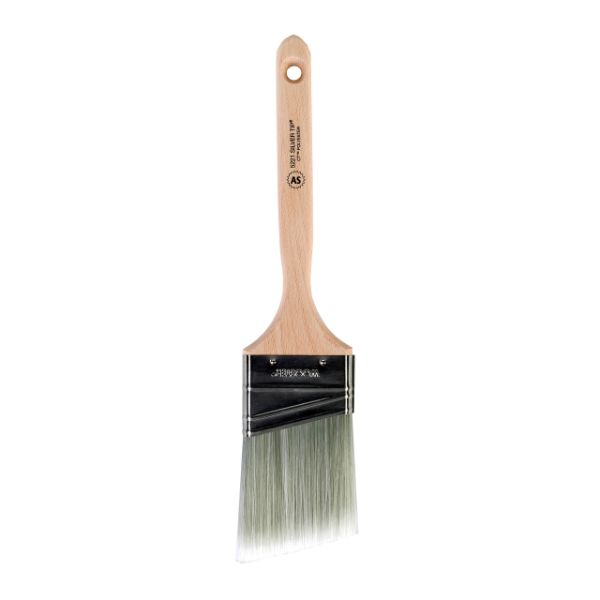
This brush only soaks up paint.
If you’re not careful, you might end up with some significant drips and splatters.
Once you get the hang of it, a brush like this loads up incredibly quickly and is excellent for any seasoned painter.
This brush does occasionally shed a few bristles right out of the package, according to some painters who have used it.
The solution is to gently shake out any loose bristles by gently manipulating the brush with your hand.
Use the brush as usual from that point on. It needs to immediately tighten and stop shedding.
Best For Laser-etched Grip—ROLLINGDOG Mini Master 2
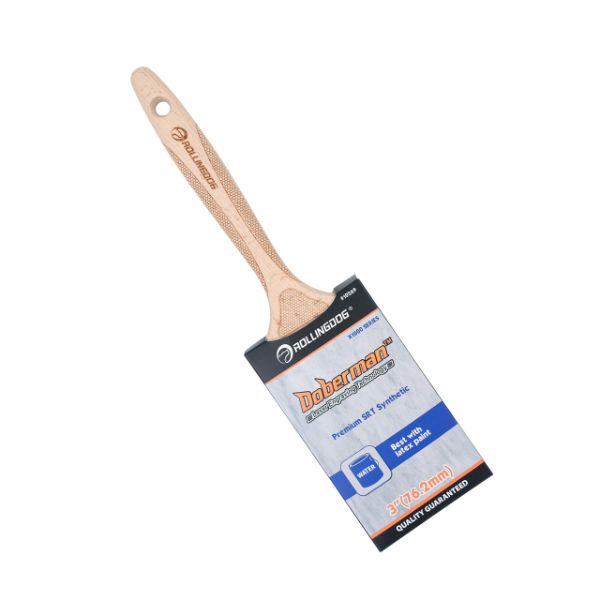
To be completely honest, we’re not just looking at looks.
However, this brush looks absolutely fantastic.
Compared to a typical mini-brush like the Wooster Shortcut, its bristles are longer.
You can tell right away how high-quality the ROLLINGDOG is from one quick glance at its textured handle.
This quirky little brush would make a wonderful fifth pocket addition and could be used in a variety of painting projects.
Best Paint Brush For Trim With Natural Bristles—Infiniti Elementz
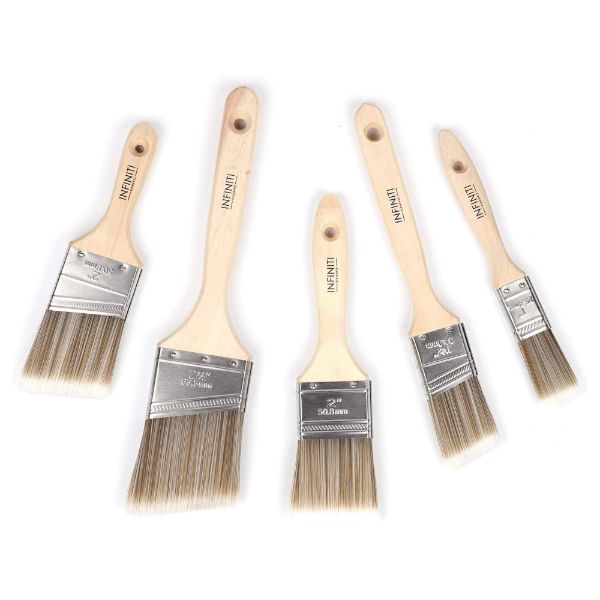
Set your sights on this set of brushes if the paint you’re using on your trim calls for natural filaments to complete the task. However, there are other helpful features besides the brush composition. These two paintbrushes have rounded heads, which is a feature designed for tackling the intricate details and tiny angles that baseboard, molding, and accent wall trims frequently have. The notoriously difficult chalk-finish paints can also be applied with these tools. One reviewer who was repainting a bathroom commented, “The smaller brush was phenomenal for cabinets because it really gets into all the nooks and hard to reach places,” though warned that after several washes these brushes may need to be replaced.
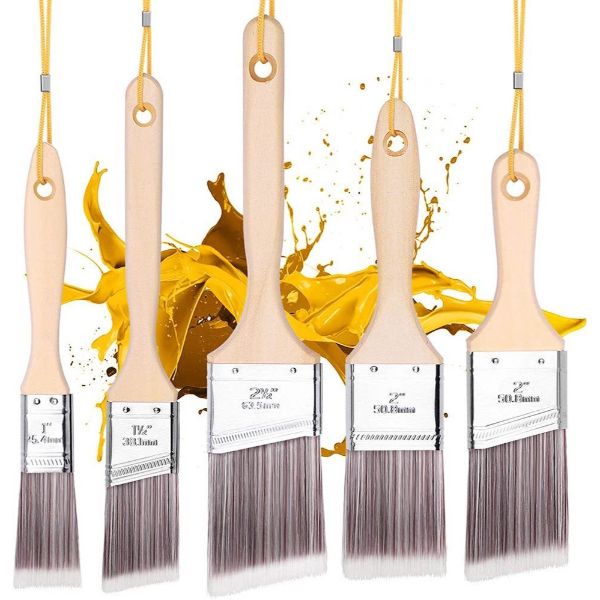
Best Paint Brush For Crown Molding—Squish
You’ll be ready for any type of trim if you have a variety of brushes. This set includes five paintbrushes, two of which have angled heads and are one to two inches wide. The handy lanyard attached to each brush means you won’t be dropping them any time soon, and one happy shopper explained, “These brush strokes are incredible! I adore the handle’s string, which I use to secure the brush to my wrist. They create a nice, clean line at the ceiling and move smoothly along the walls.”
Best Paint Brush For Baseboards—Richard
Painterly challenges can arise when painting baseboards. Without removing and replacing the boards, you are left with the difficult task of stooping down and attempting to find the ideal position in order to maintain a steady hand, avoid messes, and obtain a sharp, precise finish. This Richard paintbrush’s flexible neck prevents your hands from having to perform the awkward hand balancing act necessary to reach tight spaces, awkward angles, and even tasks that call for extension poles. Additionally, those who have arthritis or limited mobility can paint comfortably thanks to the handle. “I was able to bend it to fit any of the trim pieces on the building for a smooth no-mess brushstroke,” described one reviewer. “In order to avoid bending over as much, I have also used it to paint interior bottom trim. Simply bend the head at the necessary angle.”
Considerations For Choosing The Best Paint Brush For Trim
Paint brushes come in four main parts: the bristles, also known as the sash; the ferrule, which is the metal piece that connects the bristles to the handle; the crimp, which is the riveted section that tightens the ferrule around the handle; and the handle, which can have a variety of shapes and is typically made of wood or acrylic. The handle, the bristle shape and material, and size should all be carefully considered when selecting the best paint brush for trim work. The ferrule and crimp are less crucial characteristics.
Size
Brushes that are typically used for house painting range in width from 1 to 6 inches. As a general rule, smaller brush widths are better for cramming more paint into tighter spaces, while larger brushes finish jobs more quickly because they can hold and apply more paint in one stroke.
Trim brush sizes fall between 1 and 2½ inches wide within that range because they are made for smaller spaces. Although 1 to 2½ inches may seem insignificant, it is much simpler to extend the application time than it is to scrape off excess paint that was applied with a brush that was wider than necessary.
On the other hand, the sash’s length isn’t that crucial. However, when evaluating how comfortable a brush is to use, keep in mind that the handle length can have an impact on the brush’s ergonomics.
Shape
The bristle shape of trim brushes varies greatly, but they almost always have a flat, angled style as opposed to being round. There are three main categories of shape to choose from:
- Chisel: Chisel brushes have bristles that are angled, making them perfect for drawing precise, straight lines. In corners and along edges, professionals frequently use chisel brushes.
- Angled: Angled brushes, also known as cutting brushes, have bristles that are cut at an angle, enabling the user to create precise, even lines. Particularly useful for confined spaces are angled brushes.
- Square: Square trim paint brushes are widely used to apply paint to flat surfaces. Square-cut brushes are more effective, but they are less precise and controllable than their chisel and angled counterparts.
Bristle Material
Bristles come in two varieties: natural and synthetic. Horses, pigs, badgers, sables, and other animals’ hair is used to make natural bristles. Polyester or a nylon and polyester blend are the main ingredients in synthetic bristles, which are typically cheaper. Similar to your own hair, natural bristles have minute splits all throughout the fiber that enable them to hold more paint and apply a smoother finish. A natural-bristle paintbrush shouldn’t be used with water-based paint because it will absorb too much of it and apply it unevenly because of these splits, though. The best applications for natural-bristle brushes are oil-based paints and conventional wood finishes like polyurethane and shellac. Synthetic brushes are perfect for latex and acrylic-based paints because they aren’t nearly as absorbent as natural-bristle brushes.
Handle
Even though some handles are made for particular jobs, comfort is ultimately what determines which handle is best for any given project. After all, the entire project might fail if the paintbrush is uncomfortable to use. For instance, while a short handle can reach places that are difficult to reach, using one for the duration of a project may cause the user’s hand to get tired quickly. A large handle, on the other hand, might be difficult to consistently grasp. Finding the right balance between comfort and efficiency is important for many home improvement projects, including painting, and nowhere is this more true than in the handle selection. See more about Best Paint Brush For Cabinets
The Different Types Of Trim Paint Brushes
There are no unquestionably correct solutions in the art and craft of painting, like many other issues. Trim brush preferences are also accurate in this regard.
Personally, a 2 1/2″ brush with an angled tip is what I received training in painting trim, and I still favor doing it. Perhaps your personal preference differs slightly or significantly.
Natural Bristle Brushes
A natural bristle brush is frequently used for painting varnishes, oil-based paints, shellac, and polyurethane finishes, so it’s not your typical choice for painting trim work.
The bristles of these natural brushes are typically made of animal hair.
They naturally frizz out at the ends due to a nice natural characteristic. This phenomenon is called flagging and on a good quality natural bristle brush, it actually helps the brush hold more paint.
Blended Nylon/polyester Brushes
Working with and cleaning a nylon or polyester brush are simple tasks. Polyester is excellent at keeping its shape, while nylon is a very strong material.
For paintbrush bristles, this combination of these two materials makes for the perfect blend.
Suggested reading: One of the best ways to quickly improve the appearance and ambiance of a space where you probably spend a lot of time is by updating your kitchen cabinets. So, how much does it cost to paint kitchen cabinets?
How Can Interior Trim Be Painted?
Move the furniture out of the way and tape the flooring where the trim meets it before you begin trimming.). To smooth out rough surfaces, use sandpaper on the woodwork. Fill dents and holes with putty, let them dry, then resand the surfaces to make them smooth. To lower the possibility of spotting when applying paint, prime bare wood and filled areas. The trim can now be painted. Pour the meticulously mixed paint into a tidy tray. Brush about an inch of paint into the bristles of the brush, then gently slap the brush against the tray’s sides to scrape off any excess. A few feet of the trim should be dyed with brief strokes. The freshly applied paint should then be smoothed with a single, long stroke. Read this article for more advice on painting trim.
How Can I Paint Trim Without Making Brush Strokes?
Pick the paint and get a quality brush with soft bristles that would match the chosen paint type in order to achieve a clean and smooth finish without messy brush strokes on the first try. Stiff bristles leave unwanted brush strokes. Sand and dust the surface to prepare it. Go left to right when painting, not up to down, and go with the grain rather than against it. Keep the paint on the brush instead of wiping it off. More helpful advice on painting trim without brush strokes is compiled in this article, so slap it off instead.
Which Should I Choose When Painting Trim: A Brush Or A Roller?
When painting trim, which is preferable, a brush or roller? Comparatively speaking to brushes, rollers offer a smoother finish and a more uniform paint coating. However, using a roller to work on tiny tasks or components (corners, joints, etc.) is inconvenient.). In addition, you won’t be able to hide the delicate trim work. In order to cover the areas the roller can’t reach, you will need to use both of the tools: a roller for the middle of the trim and a brush for the rest. I think using a brush is more effective because it only requires one item.
If you’re considering doing it yourself,-painting part of your home, you want to make sure that you get it right the first time. There is very little margin for error when it comes to your time and money. Even though painting your cabinets seems simple enough, you might find yourself second-guessing your decision. What is the best paint brush for cabinets?
Tips For Painting Trim
The best trim brushes can last for years if they are taken care of properly. For a brush to be as useful and valuable as possible, follow these instructions when using, cleaning, and even storing it.
- Before cleaning and storing the brush, use it up completely; if necessary, run any remaining paint onto some newspaper or other scrap material.
- When you’re finished using the paintbrush, submerge it in a solvent. Use mineral spirits or turpentine to remove oil-based paints and hot water and dish soap to remove latex paints.
- Before storing the brushes, shake and spin the brush to get rid of any excess water after washing it in warm, soapy water.
FAQs
Finding the best brush for trim paint is harder than you might think because there are so many options available, all of which promise to do the job. Some brushes work better for particular tasks than others. The ergonomics of the handle, for instance, may be more important if you have a lengthy painting task that will take many hours to complete. Great results will be more likely if you use the right brush in the proper way.
Still unsure of the ideal brush to use when painting trim? Here are some of the most typical queries regarding the proper handling and maintenance of paint brushes for trim.
What Kind Of Paintbrush Is Ideal For Trim?
The ideal paint brush for trim will have an ergonomic handle that fits your hand comfortably and an angled or chiseled sash that enables you to draw precise lines without worrying about paint spillover. Remember that a trim brush shouldn’t be more than 2 ½ inches wide or more than 1 inch narrow.
How Can I Paint Trim And Get A Smooth Finish?
First and foremost, a brush with soft bristles works best for smoothness. The finish generally tends to be smoother the softer the bristles are. Prior to beginning your first coat, make sure the surface you’re painting is dust- and debris-free.
Should I Paint The Walls Or The Trim First?
Because it requires the most intricate work and is simpler to complete when you don’t have to worry about fixing your mistakes, professional painters usually paint the trim first. This is because you can simply cover up any mistakes you make when you go back to paint the walls and ceiling. Additionally, it isn’t too difficult to tape off the freshly painted trim once it has dried and you have begun painting the ceiling and walls.
Which Paint Is Applied To Trim?
Despite being more expensive, some paint manufacturers offer paint that is especially designed for trim. Oil-based paint is less expensive than trim-specific paint and has the same viscosity that helps it stay put when applied vertically and the same slow drying time that allows it to fill any dents and scratches, which is especially helpful for baseboard trim. Also, keep in mind that surfaces with a semi-gloss or shinier finish are the simplest to clean.
Should I Prime The Trim Before Painting It?
If you are repainting your trim in the same color as before, you don’t need to worry about priming, but if this is your first time painting it, adding a layer of primer can help create a smoother look.
Before Painting, How Do I Clean The Trim?
Prior to painting, use tack cloth, a lint-free rag covered in a sticky substance that attracts and eliminates dust and debris. The best substitute for buying tack cloth is using a damp cloth.
Conclusion
You would remove your trim, use a paint sprayer, and completely recoat it if it were possible. After the trim has been painted and has had time to dry, you would then repaint it and reattach it to the wall.
In this real world, you’re going to end up painting this trim with a brush like one of the ones we’ve recommended here.
Here is a brief overview of proper technique from a professional painter for those who are unfamiliar with painting trim.
I appreciate you reading.